# Deploying to GitHub Pages using GitHub Actions
When deploying the Kaizen Dorks website to GitHub Pages, I realized that the vuepress documentation does not cover how to deploy using GitHub Actions.
# How a manual script looks like
Before looking at GitHub Actions let's do a quick recap on how a static site such as a vuepress site needs to be deployed to GitHub pages.
By manual script I mean one you will manually run from your laptop!
# Step sequence
If you were to manually deploy the static site, the sequence of steps would look as follows:
- Check out the branch with your source files
- Install your dependencies. In the case of vuepress, you would do
npm installor even betternpm ci - Generate the static HTML/JS/CSS files from your source. In the case of vuepress, you would do
npm run build - Push the generated files to the publishing source of your GitHub Pages site.
# GitHub Pages publishing sources
The publishing source is simply the branch and folder where GitHub should find the static HTML/JS/CSS files for your website. See the GitHub Pages documentation
What is confusing is that GitHub Pages expects the static HTML/JS/CSS files of your site in a different publishing source dependending on the type of repo.
- For user/organization repos the publishing source is always the
masterbranch (actually the branch configured as the main branch for that repo) - For normal repos you have a couple of options. You can choose between:
- the
gh-pagesbranch - the
masterbranch - the
/docsfolder inside themasterbranch
- the
Let's clarify the distinction between normal repos and user/organization repos:
- The organization repos are the ones named like
username.github.ioororganization.github.io. For example, kaizendorks.github.io. - Every other repo is a normal repo. For example, vue-autowire.
This affects your development workflow!
In the case of user/organization repos, since the static files need to be pushed to the master branch, you are forced to use a different branch to develop your site.
For example, the code that makes this website is located in the source branch. Whenever changes are made and pushed to the source branch, the static HTML/JS/CSS files are regenerated and force pushed to the master branch!
With normal repos you can keep developing your site in the master branch. Whenever changes are made, the updated static HTML/JS/CSS files are pushed to the gh-pages branch.
# A manual bash script
The vuepress documentation covers this in detail, and makes easy to create a bash script that performs those steps.
Let's assume we have a vuepress site as follow:
- Uses the
npm run buildcommand to build the static files - Builds the static files in the
docs/.vuepress/dist - Its a normal GitHub repo
- Will be published to the
gh-pagesbranch
Then you create a deploy.sh script like:
#!/usr/bin/env sh

# abort on errors
set -e

# build
npm run build

# navigate into the build output directory
cd docs/.vuepress/dist

# create new git repo from scratch with a single commit containing the generated files
git init
git add -A
git commit -m 'deploy'

# Force push to the "publishing source" of your GitHub pages site
# in this case, the gh-pages branch
git push -f git@github.com:<USERNAME>/<REPO>.git master:gh-pages

# Back to previous directory (the root of your repo)
cd -
This should be easy to modify for any other static sites, including non vuepress ones.
For example, this website generates its static files in the wwwroot folder and the built files need to be pushed to the master branch (since it is an organization repo). Therefore, we just need to change a couple of lines in the script:
#!/usr/bin/env sh

# abort on errors
set -e

# build
npm run build

# navigate into the build output directory
cd wwwroot

# create new git repo from scratch with a single commit containing the generated files
git init
git add -A
git commit -m 'deploy'

# Force push to the "publishing source" of your GitHub pages site
# in this case, the master branch
git push -f git@github.com:kaizendorks/kaizendorks.github.io.git master

# Back to previous directory (the root of your repo)
cd -
That's it, this bash script does the job. If you have made changes to your website, you can simply run ./deploy.sh from your laptop and the script will publish the updated site to GitHub pages.
# Deploying using GitHub Actions
Let's now see how we can replace the bash script with an automated GitHub Actions workflow that performs the same steps whenever we make changes to the site source.
GithHub actions is a powerful way to automate workflows based on events from your GitHub repository, such as new commits or PRs. It is a fairly new product, with a public beta in 2018 and general CI/CD functionality released to general public in 2019.
As of today, it is already very powerful and flexible. It is based on Docker and makes it easy to create your own actions, with a healthy marketplace of community provided actions available.
Imho, this is a very interesting product. Whether it will dominate the CI arena or not, we'll see!
# Getting started
Adding a new workflow using GitHub Pages is very straightforward.
If you open your repo in the GitHub website, you will see an Actions tab. When you navigate to this tab, you will be greeted with a page that lets you start from some preconfigured workflows or to create your own.
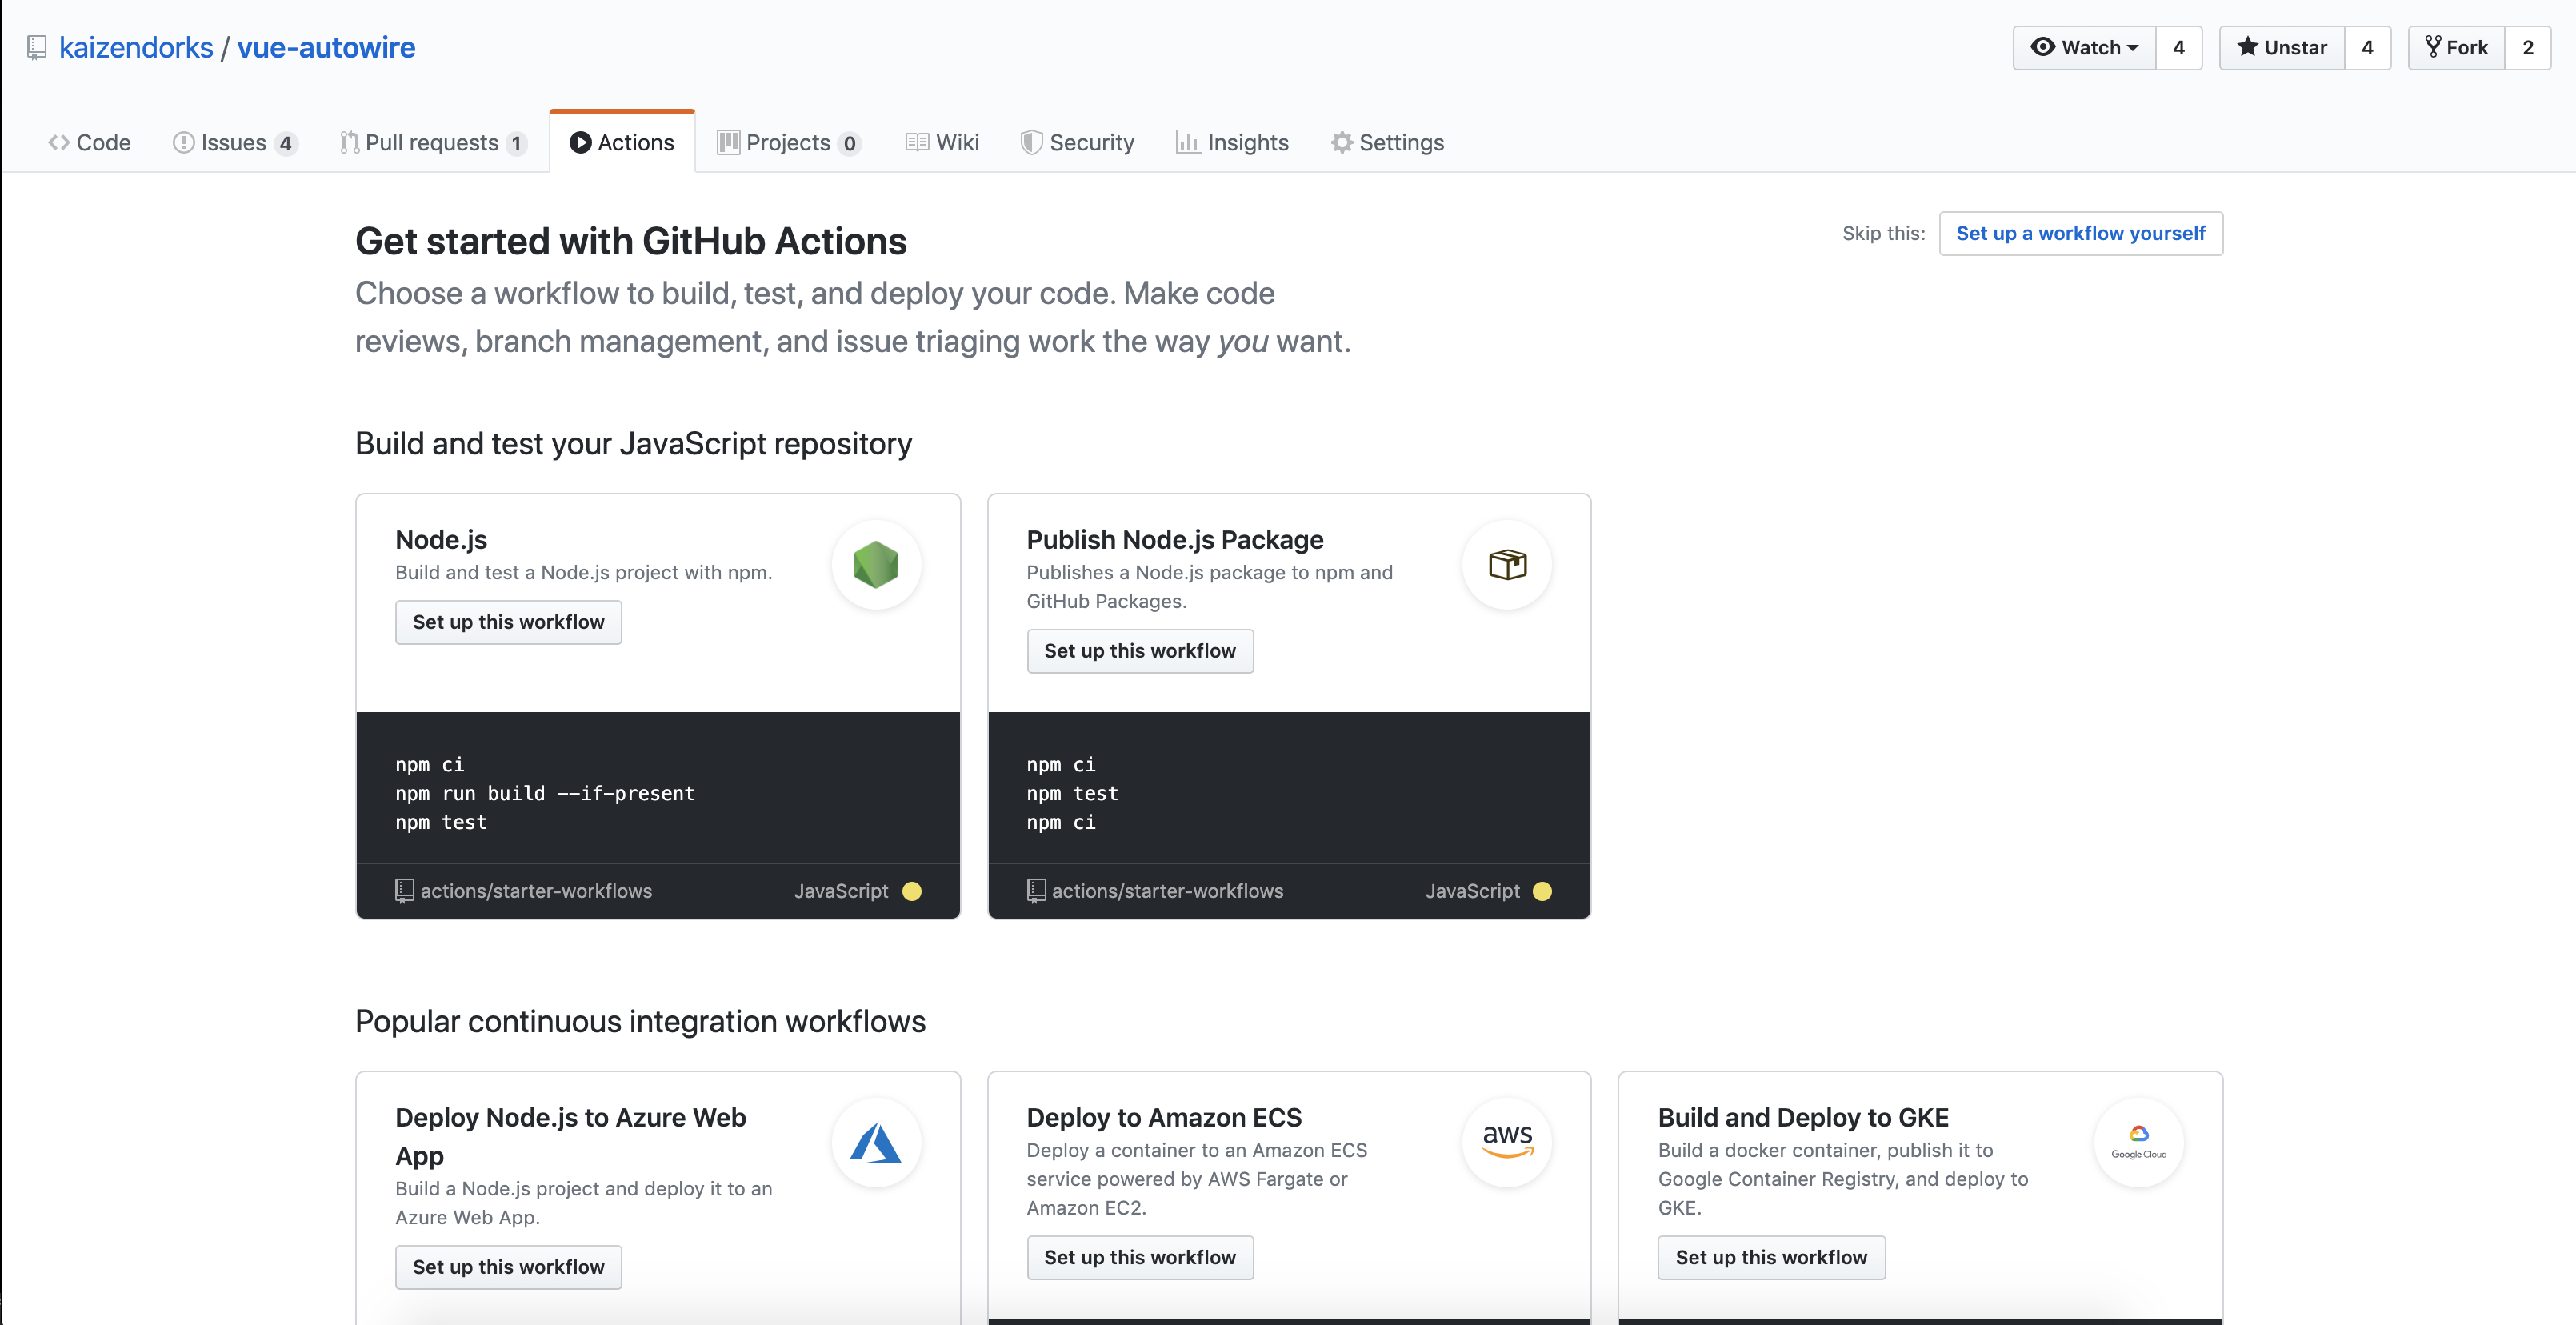
Select the option Set up a workflow yourself, where a sample workflow file will be generated for you that showcases the basic of GitHub Actions.
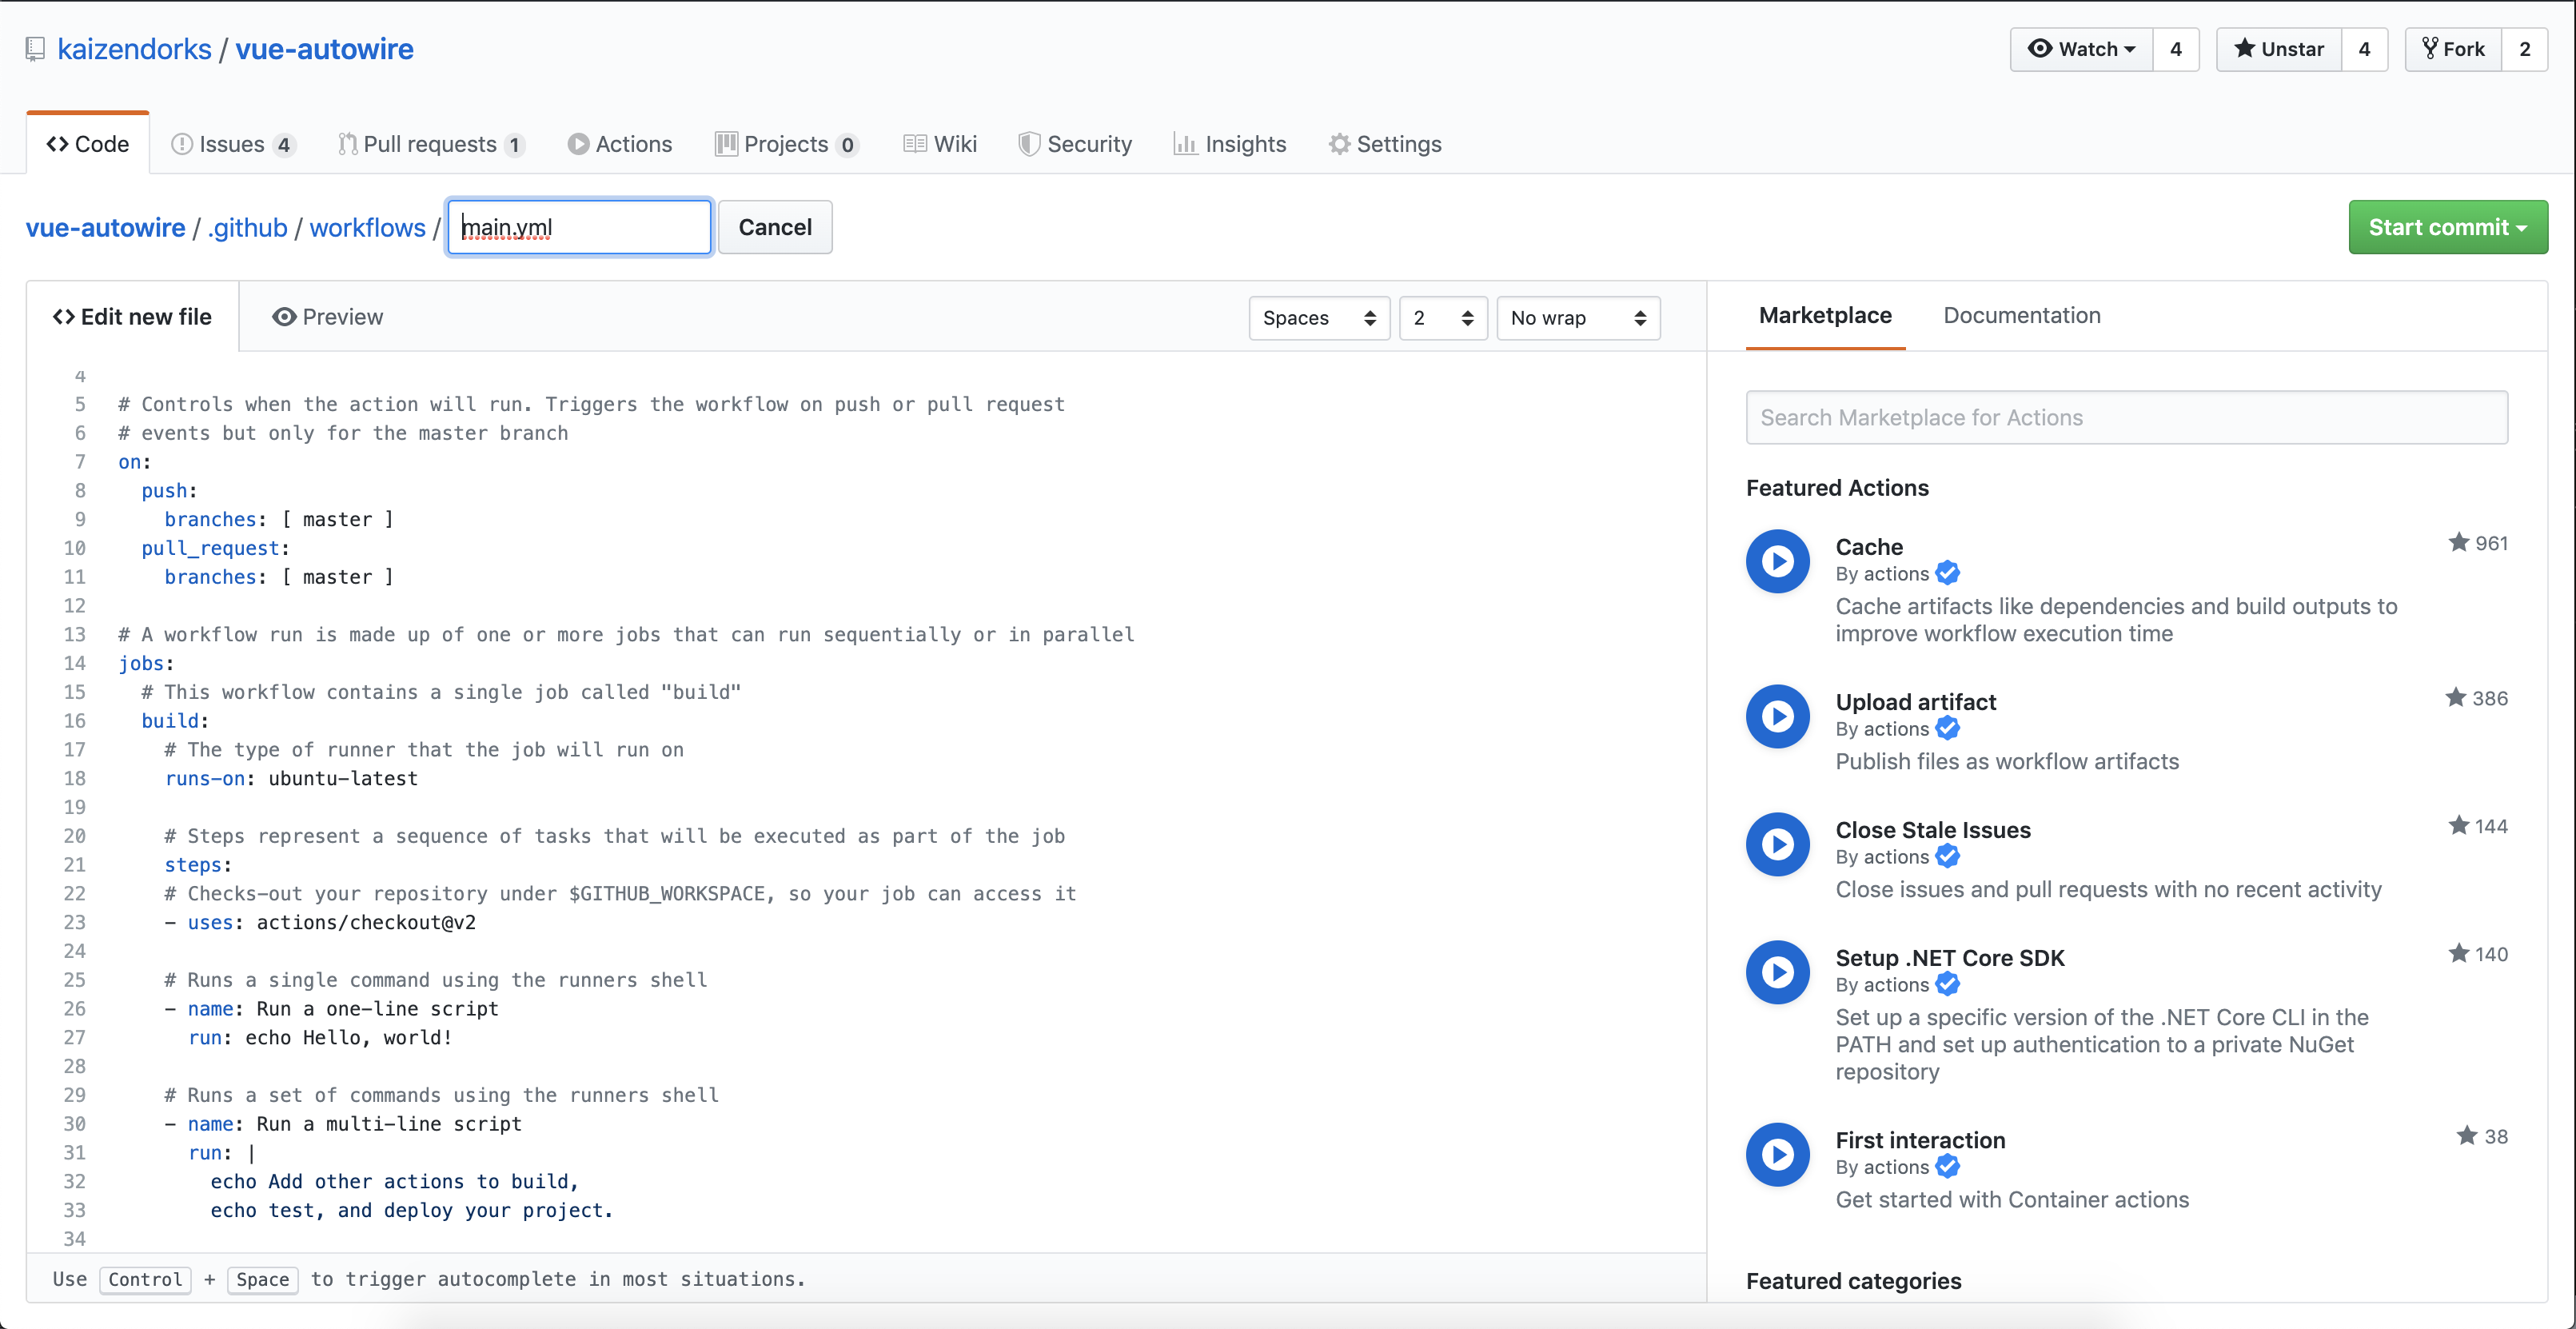
As you can see, a workflow in GitHub Actions:
- Is defined by a YAML file located inside the
.github/workflowsdirectory of your repo - It is triggered by one or more events of your repo, such as new commits or new PRs
- Has a number of jobs that can run either in parallel or in sequence. Each job starts on a fresh instance and does not share state! (unless you push that state somewhere yourself)
- Each job has a number of steps. These are the individual tasks where you run either bash commands or actions
The concept of action is very interesting. It lets us encapsulated common tasks so they are easily reusable in workflows. For example, there are actions for checking out your code, for publishing a library to NPM or for pushing changes back to your repo.
Some are officially maintained by GitHub while others are community-driven!
# Building a static site
Let's get to work and start creating a GitHub Actions workflow to publish a static site.
If your repo doesn't have one, create the directory .github/workflows. Inside the workflows folder, add a new file deploy.yml with the following contents:
name: Deploy to GitHub pages

on:
  push:
    # this might change depending on whether you are publishing a site for a normal repo or a user/organization repo
    branches: [ master ]

jobs:
  build:
    runs-on: ubuntu-latest

    steps:
    - uses: actions/checkout@v2

    - name: Run a multi-line script
      run: |
        echo test the checkout action,
        ls -a
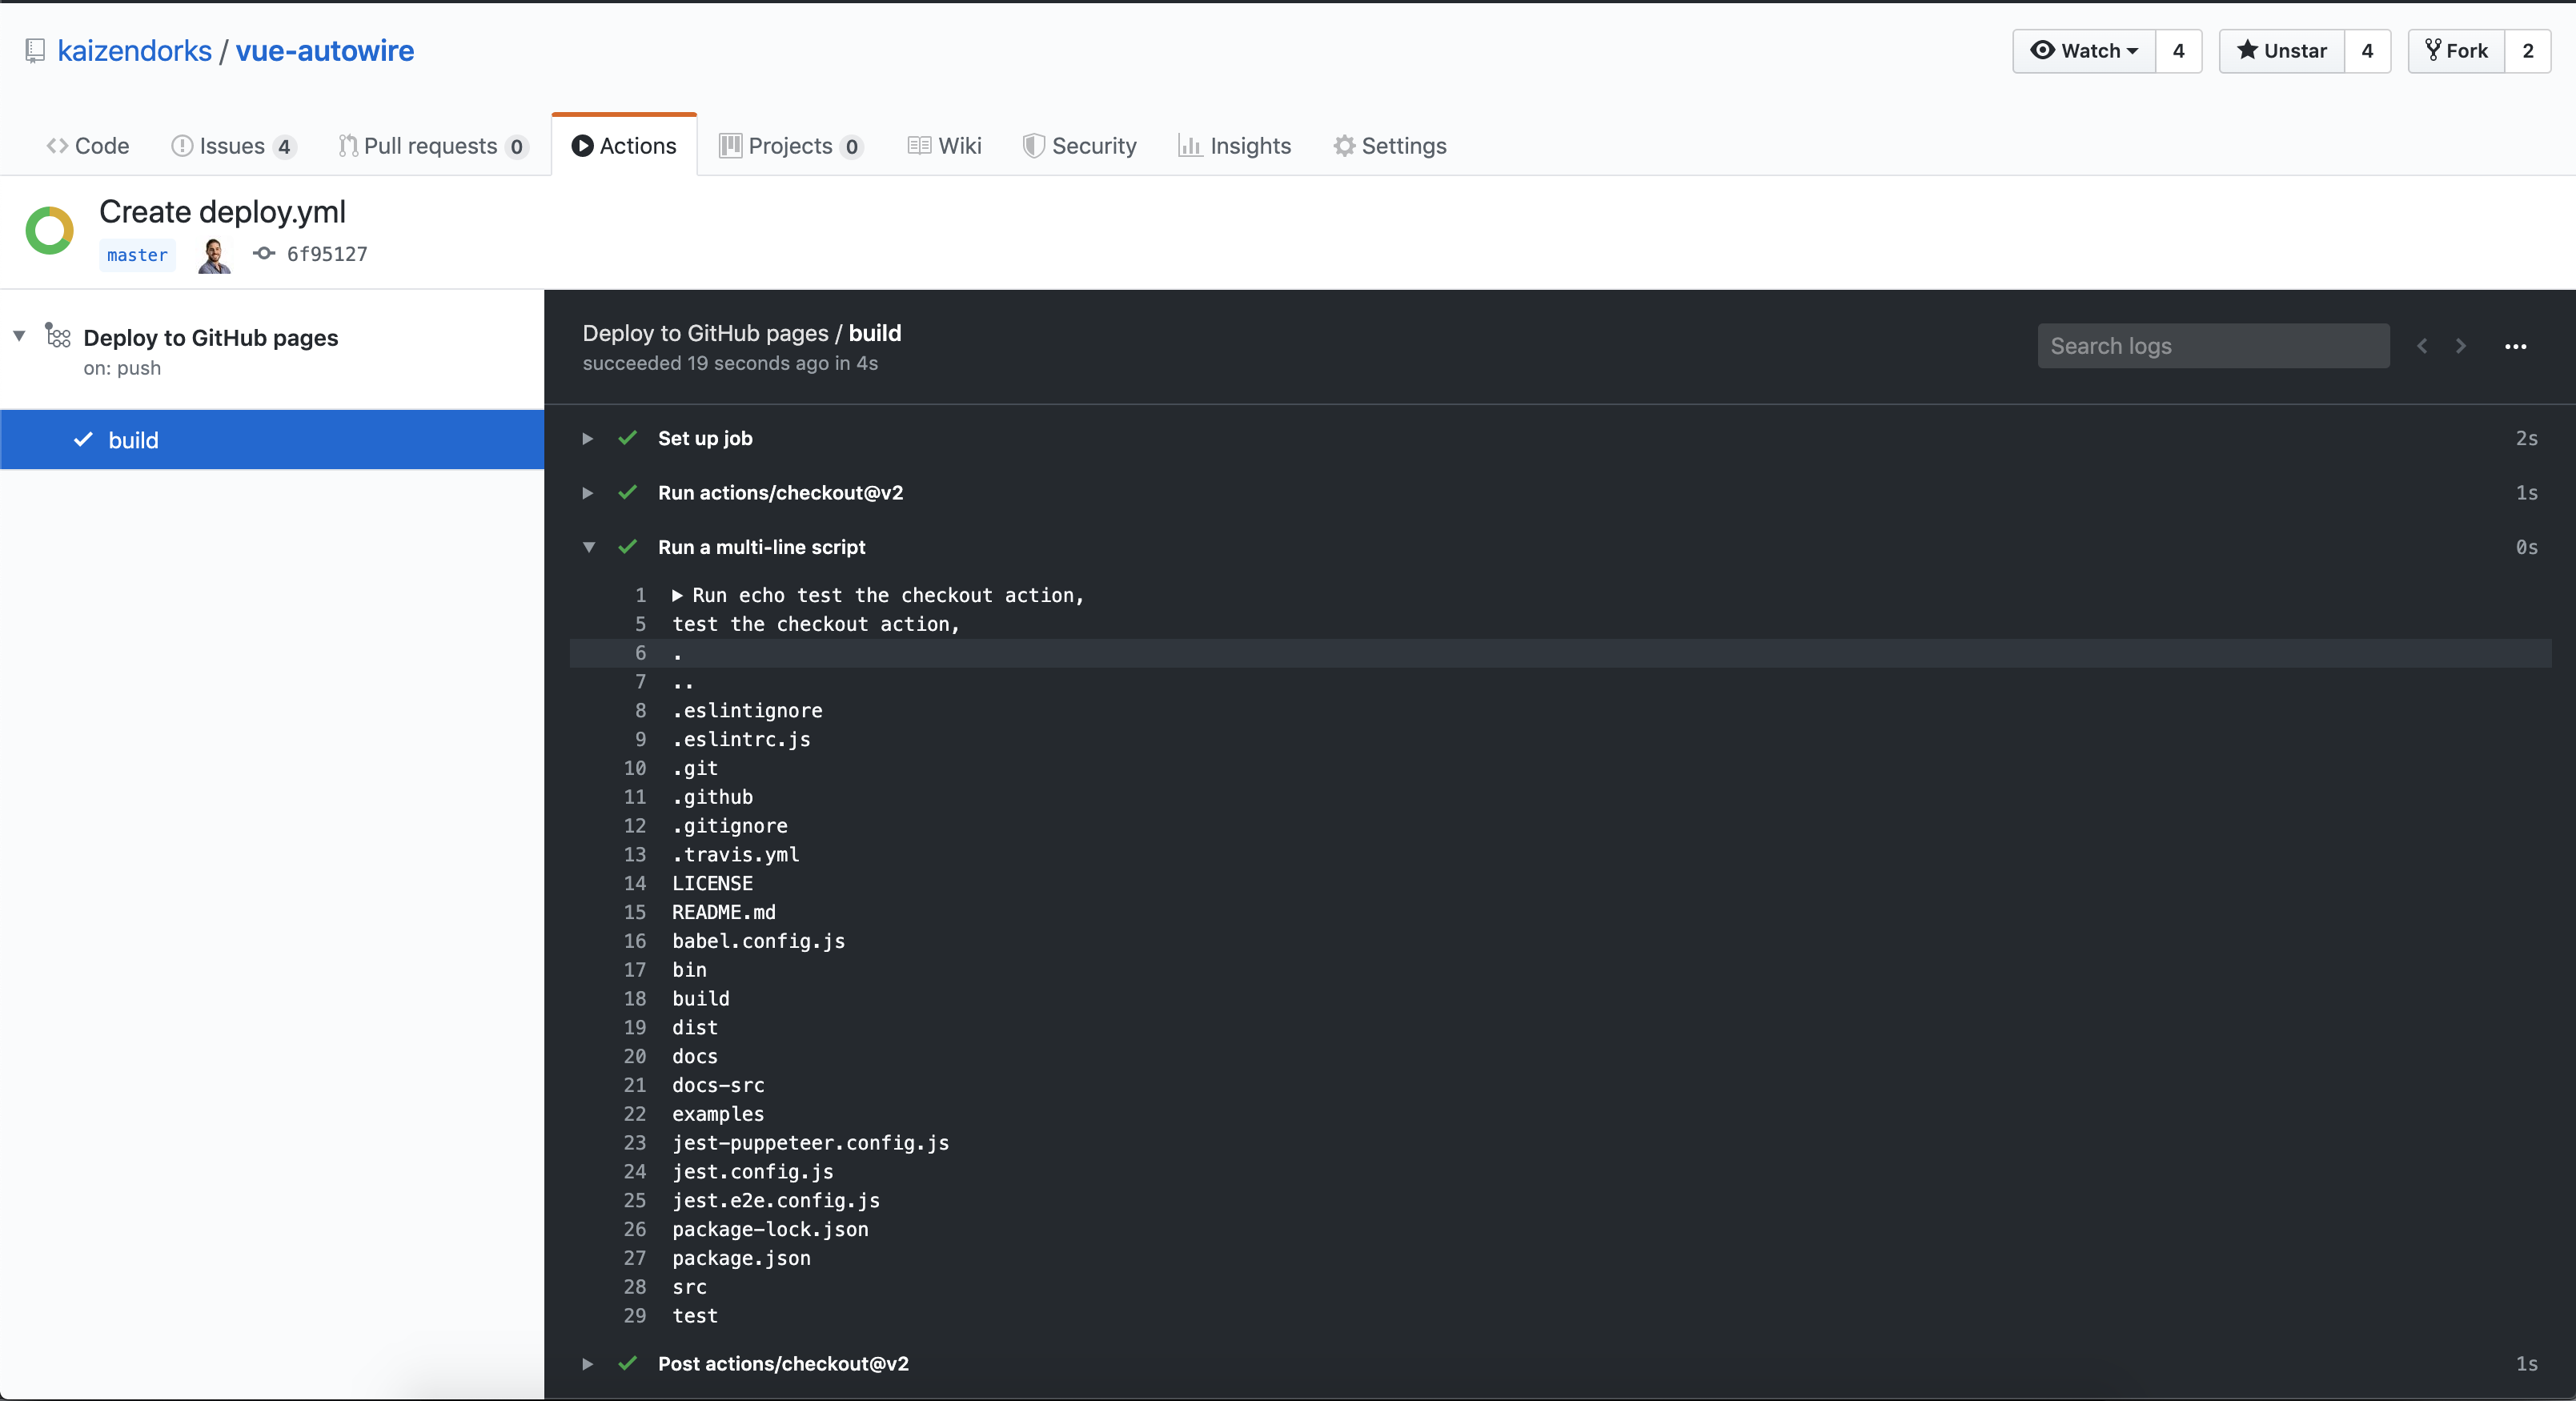
This is a simple workflow with a single job.
- It will be triggered when new commits are pushed to master (this might change depending on the type of repo, as per the GitHub Pages publishing sources discussion)
- Runs on an
ubuntu-latestmachine. See the documentation on hosted runners - It has 2 steps:
- The first one runs the
checkoutaction, which will checkout the contents of your repo. This is an official action provided by GitHub, and you can see the instructions in the marketplace. - The second one simply runs regular ubuntu commands so you can test the contents of the local folder after the checkout action (which should contain all the files from your repo)
- The first one runs the
If you commit this file and go to the Actions tab of your repo in GitHub, you should see it running. You can see each step and the output of each step:
Let's update this workflow so we generate the static HTML/JS/CSS files for our site.
In the case of a vuepress site, we need to run the npm run build command. In order to do so, we need to add an action that will setup Node.js and its dependencies in the machine running the workflow. Therefore, we will use another official GitHub action, the setup-node action, whose instructions you can see in the marketplace.
Let's replace the test steps running the echo and ls commands with the ones that will setup node and will run npm run build:
# rest of the workflow file omitted

    steps:
    - uses: actions/checkout@v2

    - name: Generate static vuepress files
      uses: actions/setup-node@v1
      with:
        node-version: '12.x'
    - run: npm ci
    - run: npm run build
That's it, now when this workflow runs, it will setup node, install all dependencies and run the npm run build command. The static HTML/JS/CSS files should be available within the output folder!
# Publishing the built site
If you remember the sequence of steps, all we have to do now is to get the generated static files and push them to the publishing source of our GitHub Pages site. What we did in the manual bash script was to move to the folder where the files were generated, initialize a new empty git repository and then force push to the publishing source branch.
Let's assume a normal repo using gh-pages as its publishing source, using vuepress to generate the static files in the docs/.vuepress/dist folder.
- First we need to add the steps to initialize the new repo inside the folder with the static files
# rest of the workflow file omitted - name: Init new repo in dist folder and commit generated files run: | cd docs/.vuepress/dist git init git add -A git config --local user.email "action@github.com" git config --local user.name "GitHub Action" git commit -m 'deploy' - Finally, we need to force push those files to the publishing source branch. For that we need to use another action, the
github-pushaction, which is a community provided one (rather than an official GitHub action). Check out the instructions in the marketplace, although hopefully the example will be self-explanatory:# rest of the workflow file omitted - name: Force push to destination branch uses: ad-m/github-push-action@v0.5.0 with: # Token for the repo. Can be passed in using $\{{ secrets.GITHUB_TOKEN }} github_token: ${{ secrets.GITHUB_TOKEN }} # Destination branch to push changes branch: gh-pages # Use force push to fully overwrite the destination branch force: true # We have to push from the folder where files were generated. # Same were the new repo was initialized in the previous step directory: ./docs/.vuepress/dist
The GitHub token used by the last step secrets.GITHUB_TOKEN is the way GitHub Actions allow you to authenticate with your repo so you can perform actions like push or pull. See the official GitHub Actions documentation.
Behind the scenes, the actions authenticate to your repo using this token and an additional environment variables also provided by GitHub as in:
https://${GITHUB_ACTOR}:${GITHUB_TOKEN}@github.com/${REPOSITORY}.git
# The end result
When you put everything we have discussed together, you have a workflow script like the following one:
name: Deploy to GitHub pages
on:
  push:
    # this might change depending on whether you are publishing a site for a normal repo or a user/organization repo
    branches: [ master ]
jobs:
  build:
    runs-on: ubuntu-latest

    steps:
    - uses: actions/checkout@v2

    - name: Generate static vuepress files
      uses: actions/setup-node@v1
      with:
        node-version: '12.x'
    - run: npm ci
    - run: npm run build

    - name: Init new repo in dist folder and commit generated files
      run: |
        cd docs/.vuepress/dist
        git init
        git add -A
        git config --local user.email "action@github.com"
        git config --local user.name "GitHub Action"
        git commit -m 'deploy'

    - name: Force push to destination branch
      uses: ad-m/github-push-action@v0.5.0
      with:
        github_token: ${{ secrets.GITHUB_TOKEN }}
        # this might change depending on whether you are publishing a site for a normal repo or a user/organization repo
        branch: gh-pages
        force: true
        directory: ./docs/.vuepress/dist
# Adapting it to your site
It should be relatively straightforward to modify this workflow, adapting it to other static sites and/or different publishing sources.
Let's take this site (the Kaizen Dorks one) as an example:
- It is an organization repo, so the destination branch is the
masterbranch (rather than thegh-pagesone). - That also means our source branch where the workflow should listen for events should be different than the
masterbranch, in our case this is thesourcebranch - We have modified the default
vuepressconfiguration so the static files are generated into thewwwrootfolder rather than the defaultdocs/.vuepress/dist
There is only a few lines you need to change:
name: Deploy to GitHub pages
on:
  push:
    branches: [ source ]
jobs:
  build:
    runs-on: ubuntu-latest

    steps:
    - uses: actions/checkout@v2
    - name: Generate static files in wwwroot
      uses: actions/setup-node@v1
      with:
        node-version: '12.x'
    - run: npm ci
    - run: npm run build

    - name: Init new repo in wwwroot and commit generated files
      run: |
        cd wwwroot
        git init
        git add -A
        git config --local user.email "action@github.com"
        git config --local user.name "GitHub Action"
        git commit -m 'deploy'

    - name: Force push to master
      uses: ad-m/github-push-action@v0.5.0
      with:
        github_token: ${{ secrets.GITHUB_TOKEN }}
        branch: master
        force: true
        directory: ./wwwroot
This is how this website is being published, you can check it on our GitHub repo.